In this article, we will learn how a react UI is wired in an HTML page (an index page) and display Hello World text in a paragraph. We had already learned about basic setup, JSX, and ES6 concepts in an earlier tutorial. This tutorial is very basic and doesn’t expect much here in terms of advanced features, we will learn progressively further in this tutorial series.
Tools & Libraries used:
- React 16.x
- NodeJS 6.x
- NPM 5.x
Get the source code for this tutorial using any one of the ways defined below:
- Download React tutorial series source code zip. Unzip it. You can find this tutorial source code in 01-hello-world folder.
- git clone https://github.com/geekmj/react-examples.git
Note: This tutorial was tested on a Mac OS V10.13 machine. For developers using windows machines, command syntax will change a bit.
Files & Folders Structure
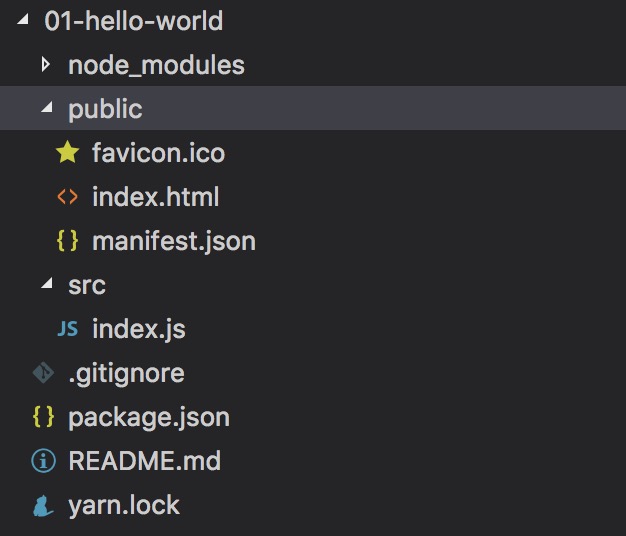 |
| Hello World project folder structure |
In our project structure, we have abstraction between how we keep source code for development and they actually get distributed for deployment on web servers using the build tool.
NPM dependency and build file
We are using NPM for client side libraries dependency management and package.json source is given below:
{
  "name": "01-hello-world",
  "version": "0.1.0",
  "private": true,
  "dependencies": {
    "react": "^16.0.0",
    "react-dom": "^16.0.0",
    "react-scripts": "1.0.17"
  },
  "scripts": {
    "start": "react-scripts start",
    "build": "react-scripts build",
    "test": "react-scripts test --env=jsdom",
    "eject": "react-scripts eject"
  }
}
index HTML file
index.html file which is the initialization point for Single Page App which has one div with id root within the body.
<!DOCTYPE html>
<html lang="en">
  <head>
    <meta charset="utf-8">
    <meta name="viewport" content="width=device-width, initial-scale=1, shrink-to-fit=no">
    <meta name="theme-color" content="#000000">
    <!--
      manifest.json provides metadata used when your web app is added to the
      homescreen on Android. See https://developers.google.com/web/fundamentals/engage-and-retain/web-app-manifest/
    -->
    <link rel="manifest" href="%PUBLIC_URL%/manifest.json">
    <link rel="shortcut icon" href="%PUBLIC_URL%/favicon.ico">
    <!--
      Notice the use of %PUBLIC_URL% in the tags above.
      It will be replaced with the URL of the `public` folder during the build.
      Only files inside the `public` folder can be referenced from the HTML.

      Unlike "/favicon.ico" or "favicon.ico", "%PUBLIC_URL%/favicon.ico" will
      work correctly both with client-side routing and a non-root public URL.
      Learn how to configure a non-root public URL by running `npm run build`.
    -->
    <title>React App</title>
  </head>
  <body>
    <noscript>
      You need to enable JavaScript to run this app.
    </noscript>
    <div id="root"></div>
    <!--
      This HTML file is a template.
      If you open it directly in the browser, you will see an empty page.

      You can add webfonts, meta tags, or analytics to this file.
      The build step will place the bundled scripts into the <body> tag.

      To begin the development, run `npm start` or `yarn start`.
      To create a production bundle, use `npm run build` or `yarn build`.
    -->
  </body>
</html>
index JS file
index JS file is the starting point for React application.
import React from 'react';
import ReactDOM from 'react-dom';

ReactDOM.render(<p>Hello world</p>, document.getElementById('root'));
We had included React and ReactDOM .
We are using ReactDOM.render the method which takes two arguments, first JSX expression for simple UI code and second HTML DOM element where React will place the UI.
Running the application in development mode
In a terminal, go to project folder 01-hello-world and run the following commands
$ npm start
Compiled successfully!
You can now view 01-hello-world in the browser.
Local: https://localhost:3000/
On Your Network: https://10.11.2.101:3000/
Note that the development build is not optimized. To create a production build, use yarn build.
Note: IP in On Your Network will be your system IP.
You will see a page below when you access the URL:
 |
| Hello World Project Web Page |
Build application for deployment on a webserver
In a terminal, go to project folder 01-hello-world and run the following commands:
$ npm run build

> [email protected] build /Volumes/Drive2/projects/project_workspace/github/react-examples/01-hello-world
> react-scripts build
Creating an optimized production build… Compiled successfully.
File sizes after gzip:
39.08 KB build/static/js/main.12cfb16d.js
The project was built assuming it is hosted at the server root. To override this, specify the homepage in your package.json. For example, add this to build it for GitHub Pages:
"homepage" : "https://myname.github.io/myapp",
The build folder is ready to be deployed. You may serve it with a static server:
  yarn global add serve
  serve -s build
The build folder contains a web server deployable package and it looks like the below:
 |
| Node app production build folder structure |
Build script created a package optimized for production deployment. It joins many js files in one and minified them for better performance. So, you can serve it from any web server.
And that’s it. Enjoy.
References
- Download the source code
- Follow Project On Github
- React Setup and getting started
- NPM & Front End Packaging
- Webpack module bundle concepts
- NodeJS and NPM installation guide
- Babel for enabling ES6
- Hello World Example At React JS documentation
Note: While writing this article, I am working as a Senior Technical Architect with Magic Software Inc.