
In this tutorial, we will learn how to set up Apache Spark for local development and get started with Java applications. We will use an Apache log file to show a few basic RDD operations.
Tools & Libraries used:
- Apache spark 2.1.1
- Gradle (3.x) / Maven
- Eclipse IDE
- JDK 1.8
- Mac OS X or Windows
Apache Spark Installation
Download the distribution
Go to the official Apache Spark download website and select spark release, package type (use Pre-built for Hadoop 2.7 and later), and download type (direct download). Click on the Download tar link.
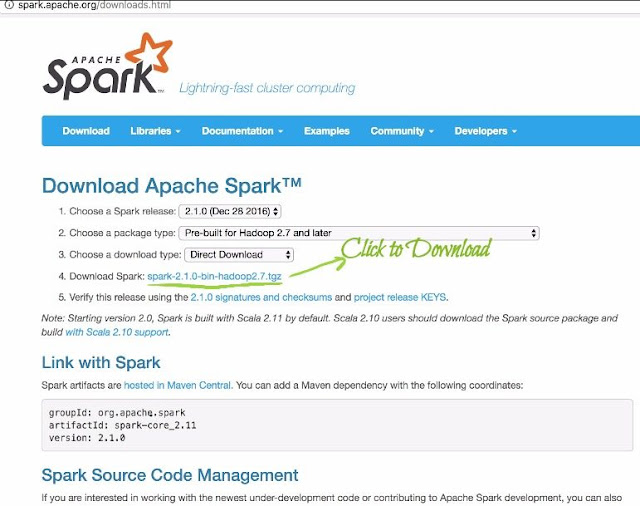
Apache Spark Download Site
Extract the distribution
Use UI-based applications (Unarchiver, WinZip, or others) to extract the downloaded tar file content. You can place the Apache Spark folder in any place your like.
You can also use the following command to untar:
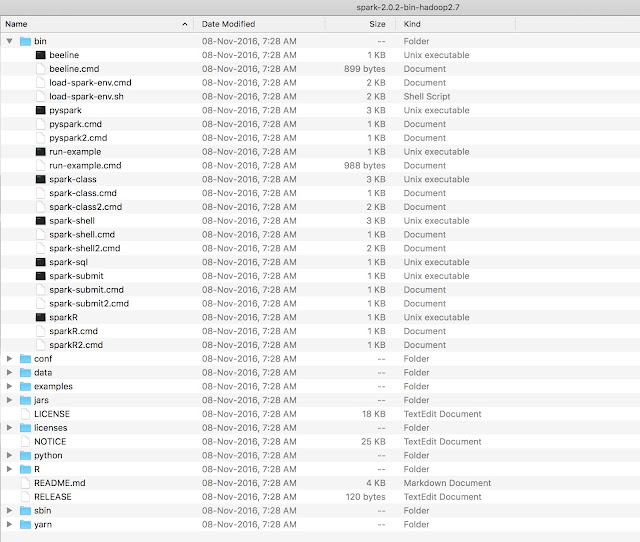
Apache Spark Folder Structure
Running Apache Spark
As you know Apache Spark is the cluster of computational engines. In the typical setting, we need at least one master node (driver program) and many executor nodes.
Apache Spark supports testable code and rapid development. For it, they give ways to start Apache Spark on a single machine (local mode). Though as a developer you have to be careful that you always code keeping cluster computational in mind.
The behavior of the program might change when it executes on the cluster as computation is done on many machines in parallel and then the result is aggregated by the master node.
For development
For ease of development, there are many ways to start Apache Spark on the local machine.
Running Spark CLI (REPL) on the local machine
Note: Our tutorial is focused on Java-based spark application and now Apache doesn’t support Java CLI. This example is for giving you an idea about Apache Spark CLI.
Starting Scala CLI (REPL), which has SparkContext initialize and available as variable sc, in local mode with 4 worker threads.
Go to the Apache Spark home directory and execute the following command
$ ./bin/spark-shell --master local[4]
Note:
- spark-shell internally use the more basic spark-submit script, which is explained later in the section
- Starting Apache Spark in local mode with following parameters
- local – Single thread with no parallel processing worker thread.
- local[K] – K worker thread for parallel processing. Ideally, it should be not greater than no cores available on the CPU.
- local[*] – The number of worker threads assigned will be equal to no of cores available on the CPU.

Apache Spark Scala shell initialize with local 4 threads
You can execute exploratory queries in the shell using the Scala programming language. We can also start the shell for Python and R. How to start a shell in Python and R is beyond the scope of this tutorial.
Running Spark application on the local machine
Go to the Apache Spark home directory and execute the following command
./bin/spark-submit
  --class org.apache.spark.examples.SparkPi
  --deploy-mode client
  --master local[*]
  /path/to/examples.jar
  args
In the above command, script spark-submit will start a local Spark executor node with as many worker threads as the number of cores in the CPUs. With deploy-mode as client spark-submit starts driver program and connect with the worker for execution. It also displays console outputs. This is very good for development.
Note: We will learn how to create a Java-based Spark application and package them further in the tutorial, so we can run that using spark-submit.
For production
For production deployment we require Apache Spark running in cluster mode using Standalone Cluster Manager, Apache Mesos or Hadoop YARN. Discussing more in this tutorial is beyond the scope of this tutorial.
Apache Spark Application in Java
Let’s start building a sample Apache Spark application that read apache log files (NASA sample log file) and does the following analysis:
- Total lines
- Total characters
- How many times files with extension.html and.gif accessed
You may clone the source code from the GitHub repository.
Github URL – https://github.com/geekmj/apache-spark-examples
Git clone URL – https://github.com/geekmj/apache-spark-examples.git
Source code Download Link – https://github.com/geekmj/apache-spark-examples/archive/master.zip
It has several Apache Spark sample projects. The log file apache-log04-aug-31-aug-2011-nasa.log for analysis is kept in the data folder.
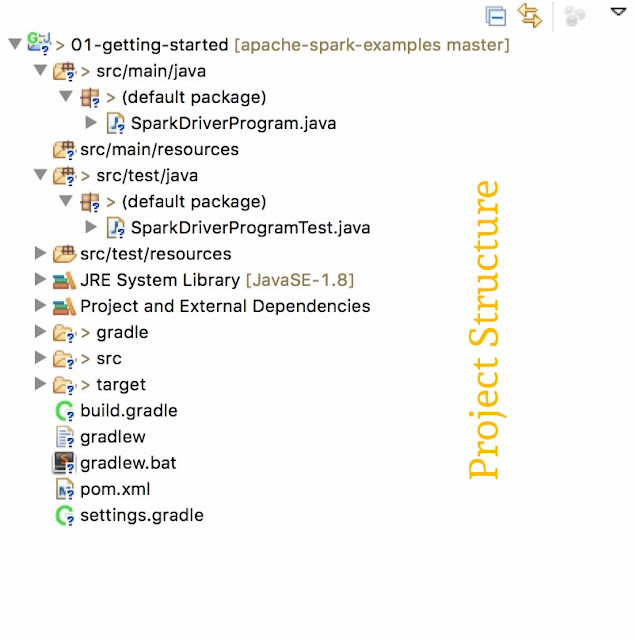
Import project inside folder 01-getting-started as Gradle or maven project. Make sure you have the Gradle plugin installed for Eclipse. Maven plugin comes by default with Eclipse.
Note: You may fresh start by creating a maven or java based project on your own and using the source code provided in this tutorial.
Gradle & Maven build file
We have provided Gradle and maven build files for the project.
File: build.gradle
apply plugin: 'java-library'

repositories {
    jcenter()
}

dependencies {
    compileOnly 'org.apache.spark:spark-core_2.11:2.1.0'
    testImplementation 'org.apache.spark:spark-core_2.11:2.1.0','junit:junit:4.12'
}
File: pom.xml
<project xmlns="https://maven.apache.org/POM/4.0.0" xmlns:xsi="https://www.w3.org/2001/XMLSchema-instance"
  xsi:schemaLocation="https://maven.apache.org/POM/4.0.0 https://maven.apache.org/xsd/maven-4.0.0.xsd">
  <modelVersion>4.0.0</modelVersion>

  <groupId>org.geekmj</groupId>
  <artifactId>apache-spark-examples</artifactId>
  <version>0.0.1-SNAPSHOT</version>
  <packaging>jar</packaging>
  <name>apache-spark-examples</name>

  <properties>
    <project.build.sourceEncoding>UTF-8</project.build.sourceEncoding>
    <maven.compiler.source>1.8</maven.compiler.source>
    <maven.compiler.target>1.8</maven.compiler.target>
  </properties>

  <dependencies>
    <dependency>
      <groupId>junit</groupId>
      <artifactId>junit</artifactId>
      <version>4.12</version>
      <scope>test</scope>
    </dependency>
     <dependency>
      <groupId>org.apache.spark</groupId>
      <artifactId>spark-core_2.11</artifactId>
      <version>2.1.0</version>
      <scope>provided</scope>
    </dependency>
  </dependencies>
</project>
Resilient Distributed Dataset (RDD)
Data and its manipulation is the key for any computational platform. Apache Spark provides its own flavor of a data structure called, Resilient Distributed Dataset (RDD), which can be created with the Parallelized collection or external dataset. RDD is partitioned into multiple sets and one set is given to one node for distributed processing. This data structure is the base for any high-level implementation in Apache Spark.
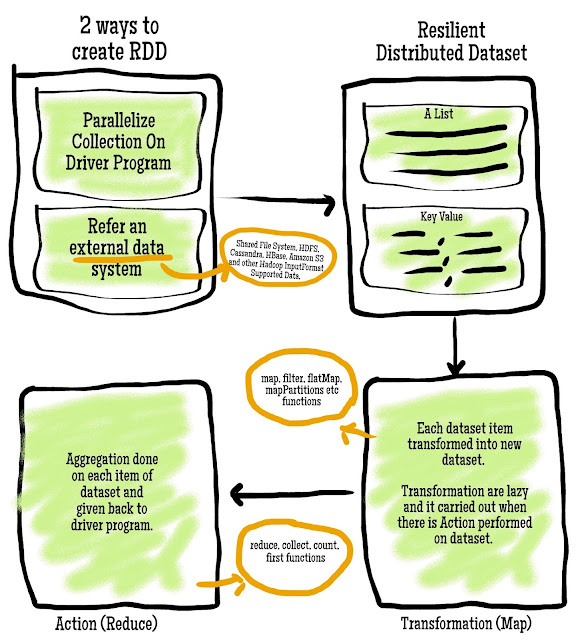
Apache Spark Resilient Distributed Dataset Lifecycle
Apache Spark driver program load parallelized collection or external data source in resilient distributed dataset (RDD) format. A few salient features of RDD are:
- They are distributed on many processing nodes for operation.
- It can also be persisted in memory for reusability.
- RDD recovers automatically from failure.
- While creating parallelized collections we can specify the number of partitions for the data set.
For our example, RDD will be created for a log file.
Driver Program
File: SparkDriverProgram.java
import org.apache.spark.SparkConf;
import org.apache.spark.api.java.JavaRDD;
import org.apache.spark.api.java.JavaSparkContext;
/*
 * (c) mrityunjay.com All right reserved
 *
 * Main Spark Driver Program Class
 * It creates Resilient Distributed Dataset for a log file (external data source)
 * It does following operation on RDD
 * 1. Total no. of lines in log file
 * 2. Total characters in log file
 * 3. Total no. of URL in log file with HTML and GIF extension
*/
public class SparkDriverProgram {
    public static void main(String args[]) {
        /* Define Spark Configuration */
        SparkConf conf = new SparkConf().setAppName("01-Getting-Started").setMaster(args[0]);

        /* Create Spark Context with configuration */
        JavaSparkContext sc = new JavaSparkContext(conf);

        /* Create a Resilient Distributed Dataset for a log file
         * Each line in log file become a record in RDD
         * */
        JavaRDD<String> lines = sc.textFile(
                "/Volumes/Drive2/projects/project_workspace/github/apache-spark-examples/data/apache-log04-aug-31-aug-2011-nasa.log");

        System.out.println("Total lines in log file " + lines.count());

        /* Map operation -> Mapping number of characters into each line as RDD */
        JavaRDD<Integer> lineCharacters = lines.map(s -> s.length());
        /* Reduce operation -> Calculating total characters */
        int totalCharacters = lineCharacters.reduce((a, b) -> a + b);

        System.out.println("Total characters in log file " + totalCharacters);

        /* Reduce operation -> checking each line for .html character pattern */
        System.out.println("Total URL with html extension in log file "
                + lines.filter(oneLine -> oneLine.contains(".html")).count());

        /* Reduce operation -> checking each line for .gif character pattern */
        System.out.println("Total URL with gif extension in log file "
                + lines.filter(oneLine -> oneLine.contains(".gif")).count());

        sc.close();
    }
}
The above code snippet is the main Apache Spark driver program.
Note: Please change the log file path as per your system.
Run the application
Using spark-submit
Go to the project home directory and build the distribution Jar.
Gradle command:
$ gradle build
It creates Jar file 01-getting-started.jar inside project_home/build/libs/.
Maven command:
mvn package
It creates Jar file apache-spark-examples-0.0.1-SNAPSHOT.jar inside project_home/target/.
Go inside the Apache Spark installation directory.
Run spark-submit command:
./bin/spark-submit
--class SparkDriverProgram
--deploy-mode client
--master local[*] path/to/jar.jar
local
It executes the Spark Application, as explained in an earlier section.
Console output:
17/05/10 19:36:44 INFO Executor: Starting executor ID driver on host localhost
17/05/10 19:36:44 INFO Utils: Successfully started service 'org.apache.spark.network.netty.NettyBlockTransferService' on port 54530.
17/05/10 19:36:44 INFO NettyBlockTransferService: Server created on 10.11.2.101:54530
17/05/10 19:36:46 INFO DAGScheduler: ResultStage 0 (count at SparkDriverProgram.java:28) finished in 0.723 s
17/05/10 19:36:46 INFO DAGScheduler: Job 0 finished: count at SparkDriverProgram.java:28, took 0.904987 s
....
Total lines in log file 784979
.....
17/05/10 19:36:46 INFO SparkContext: Starting job: reduce at SparkDriverProgram.java:33
17/05/10 19:36:47 INFO DAGScheduler: Job 1 finished: reduce at SparkDriverProgram.java:33, took 0.388462 s
.....
Total characters in log file 82949738
.....
17/05/10 19:36:47 INFO SparkContext: Starting job: count at SparkDriverProgram.java:39
17/05/10 19:36:47 INFO DAGScheduler: Job 2 finished: count at SparkDriverProgram.java:39, took 0.392778 s
......
Total URL with html extension in log file 168469
......
17/05/10 19:36:47 INFO SparkContext: Starting job: count at SparkDriverProgram.java:43
17/05/10 19:36:48 INFO DAGScheduler: Job 3 finished: count at SparkDriverProgram.java:43, took 0.404912 s
.....
Total URL with gif extension in log file 467323
.....
17/05/10 19:36:48 INFO SparkUI: Stopped Spark web UI at https://10.11.2.101:4040
17/05/10 19:36:48 INFO MapOutputTrackerMasterEndpoint: MapOutputTrackerMasterEndpoint stopped!
17/05/10 19:36:48 INFO MemoryStore: MemoryStore cleared
17/05/10 19:36:48 INFO BlockManager: BlockManager stopped
17/05/10 19:36:48 INFO BlockManagerMaster: BlockManagerMaster stopped
17/05/10 19:36:48 INFO OutputCommitCoordinator$OutputCommitCoordinatorEndpoint: OutputCommitCoordinator stopped!
17/05/10 19:36:48 INFO SparkContext: Successfully stopped SparkContext
17/05/10 19:36:48 INFO ShutdownHookManager: Shutdown hook called
17/05/10 19:36:48 INFO ShutdownHookManager: Deleting directory /private/var/folders/9v/qhdgf5gn6_ggdcp_4qdyl8s80000gn/T/spark-55700647-9ca3-431c-bc96-eebf82227fb7
Using Eclipse IDE
We should execute SparkDriverProgram as a general Java application and that’s it. We can also debug it, just like another java application.
References
- We have used Apache Log (04 Aug – 31 Aug 2011) of NASA Kennedy Space Center WWW server in Florida.
- More about submitting Apache Spark application.
- Apache Spark official programming guide.
- Download the Full Project
- Follow Project On Github